Cobalt Flux 360… Success!

I’ve done it, two Cobalt Flux pads with 360 control boxes. It wasn’t cheap, but I’m a sucker for HD output (and Xbox Live Achievements, even though I totally suck at DDR).
In the end, all you really need is a soldering iron and solder, a screwdriver, a short length of Cat5 networking cable, a Male 9-pin D-sub connector (276-1537 at Radio Shack), and a MadCatz Beat Pad.
Here’s how it’s done:
Take out all of the external screws on the white plastic shell, and open it up. Try to disturb as little as possible as you do this.

Remove the six screws that hold the central circuit board down. Lift up the board enough to reveal the ribbon connection to the pad.
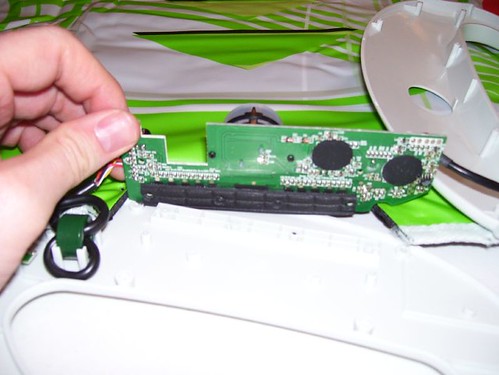
Now just separate the ribbon connector from the board. It is basically foam with some sort of adhesive on it.
On to the hard part… wiring up the dsub.
I have melted many a dsub connector before. The piece that holds the pins in place is plastic, so if you take to long to solder, you will melt it, and the pins will go all cock-eyed. So, what I did here is cut off little nibs of solder and dropped them into the pins.
Here is the dsub filled with the nibs, except for the last three, which are below.
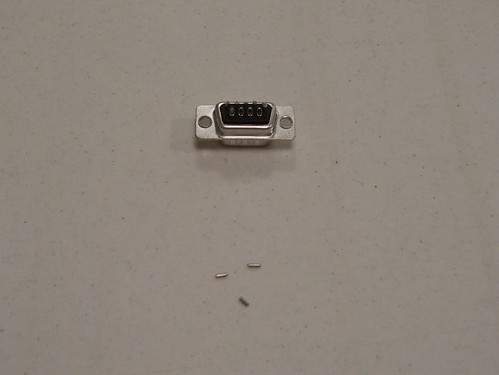
Now take the iron and touch it to each pin. The solder should flow in and fill the entire cavity.

Now you need to prep your wire. I used about a foot of Cat5. Unfortunately you need nine wires, and Cat5 only has 4-pairs. You can take a wire from another length of Cat5, or use another wire altogether. I just used some black hookup wire I had laying around.
Take the piece of Cat5 and strip an inch of the outer insulation off. Then about an 1/8th of an inch of insulation from each wire. (Don’t forget the ninth wire!)
Here’s the pinout for my particular Cobalt Flux. I, unfortunately have a pair of old-skoolers that only have eight buttons, so those of you with version 2, you’ll have to figure this out on your own!
New               OriginalColor     H   #   Color    Button

------------------------------------
Ground  - X - 1 - Purple - Ground

Blue    - C - 2 - Green  - Up

BlueS - B - 3 - Red - Down

Brown   - B - 4 - Orange - Left

BrownS - C - 5 - Yellow - Right

Green   - A - 6 - Blue   - B

GreenS - D - 7 - White - A

Orange  - A - 8 - Brown  - Back

OrangeS - D - 9 - Black - Start
I have arranged the colors in alphabetical order: Blue, Blue Stripe, Brown, Brown Stripe, Green, Green Stripe, Orange, Orange Stripe. Ground is pin 1. The?H column?indicates what hole you should run the wire through. The original color column is what color the wire was in my Cobalt Flux Control box.
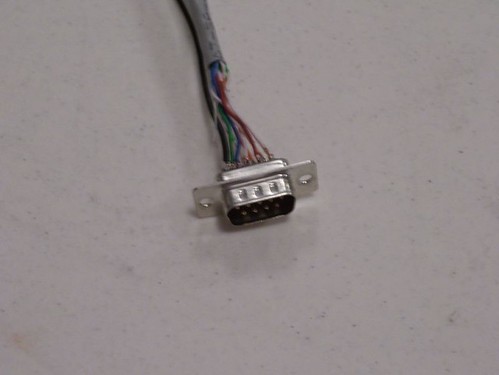
Here is?a very exciting (and blurry) pic of the completed?dsub connector?
Now you need to do is connect all this stuff to the box.
Strip about?three inches from the outer insulation?on the other end?of the Cat5.?Strip?each?wire about 1/8″. Just like last time.
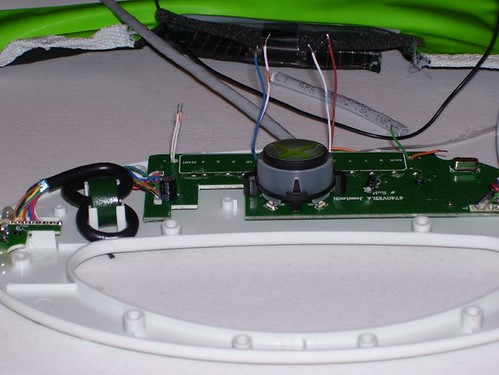
There are?four screw holes in the?central circuit board. I used these to thread the wires through creating an improptu strain relief. These are the holes mentioned in the H column above. Hole A is closest to the word “Back” silkscreened on the board. Hold D is closest to the word “Start”. Run each pair through each hole. The ground wire has no hole.
And another view… just a little blurrier!
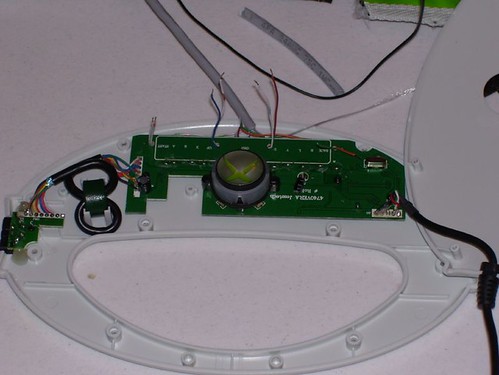
Now all you have to do is bend them over and solder them to the pads marked so nicely for you. My pad only has eight contacts, so I just ignored the “X” and “Y” solder pads.

Once you’ve done that, Put all the outer screws back in. (Do not out the four that went in the holes you just used!) All done!
Yay!?There will be much?public DDR?humiliation at the next Bunker Party!?


Gasp… you know there’s a whole bunch of us freaks out here who’d pay for someone willing to make these damn control boxes!! =)
September 14th, 2007 at 15:35I don’t own a cobalt flux, but I was wondering if this would be doable with a Red Octane Ignition 3.0.
Or have you learned/heard about any tricks to go around the USB limitations on the Xbox 360?
Thanks!
December 20th, 2007 at 15:59I second that, I would pay for such an adapter. As a matter of fact I was just on cobalt flux’s site looking to see if they sold such an adapter. You should either team up with them or sell this yourself. Do you take paypal?!
December 26th, 2007 at 08:49