Bunker Project Log

Archive for September, 2007

20 Sep

Singstar Gloatfestival – Boypower FTW!

I’m sure this will result in a game of Tamsk, Zertz, Yinsh… and my ultimate destruction. And I will probably have to video it, and declare that my wife is Teh Boardgame Mastar!!!!111one But until then, I will take what I can get.

This is just a reminder to the Bunker faithful… Singstar Amped and 80’s in the house Friday!

100_0540

I have a newfound respect for the lead singer? of Boston. These notes are long… major diaphragmage.

100_0541

So FUN!!!

100_0542

Also… SO FUN!!!!

100_0543

As Mrs. G said, I “won this on an ‘AH'”. In other words, she was up till the last note.

100_0544

D’oh

100_0545

Very fitting for me… I know:

100_0546

19 Sep

Red Hot Date With Rat Hot (in full… motion… video!!)

So I mentioned actually winning a game (for once) against Mrs. G. She wasn’t happy. So not happy that she immediately suggested we play Rat Hot, a nice simple abstract that is sort of a reverse Mah-Jong. A stacking, pairing, tile-placing extravaganza, quick enough to finish in the last minutes before Tanga flips at 10PM EST. ?

Did she win? Check out the goods below. Major props to Pottse for taking our hella boring video and giving it?Michael Bay-esque intensity!

[youtube=http://www.youtube.com/watch?v=b_TekFKtu-I]

18 Sep

Settlers of Catan – The Card Game

I don’t know why I keep buying these things, other than the skull elf keeps telling me to.

Card Games

I hate card games. I never played cards when I was a kid, and my dad was the kind of guy who would occasionally play 52-card pickup with me. (I got to play the pick-up phase of the game, just in case you are wondering.)

?That’s not for lack of trying though. At some point I discovered the magnificent phenomena known as the?”Collectible Card Game” or CCG for short. I don’t know how it happened, but I was in a Shinders in the frozen north, and discovered Mythos. I am an H.P. Lovecraft fan, so I had to buy it! Then… I bought some more, and I convinced my friends to buy some, then… we never really played it. (This is kind of my modus operandi.)

I also found the X-Files CCG, Star Wars, a tiny bit of Magic the Gathering, inherited a few hundred Pokemon cards, and although not technically a CCG, I recently discovered Pirates of the Spanish Main. Oh boy… that was a doozy.

So, I had pretty much written off getting more card anythings when I found myself in my friendly neighborhood thrift store. There, on the shelf between the 27 copies of Trivial Pursuit, and the 3 different versions of Operation, and?below the shelf with both 13 and 1313 Dead End Drive, I found,? Settlers of Catan, the Card Game. For 80 freakin cents.

I was ecstatic. I ran all around the office with a big fat smile on my face and told all?one of the people who would give a rat’s ass about it.

If I remember correctly, she was non-plussed. I think the exact response was: “Settlers? As a card game?” followed by a drawling “I don’t know…”

Anyway, I was still stoked, so I took my prize home and?promptly forgot it.

Until?last night!

That’s when I finally decided…?I’m going to play this game with Mrs. G!?And we are going to love it!

Here’s how it goes: (For the rest of this… whatever it is… I will refer to “Real Settlers” as RS.)?

There are?four types of cards. They are all square, and about the size of the short edge of a standard playing card.

Regions -??these are like the?hexes in RS. Each represents one of the classic Catan resource types??and has a number in the middle designated by a face of a standard d6. On?three edges are pictures of the corresponding resource. For example, the mountain region has one ore symbol on one side, two ore symbols on the next, and three on the other. The fourth side is blank. Unlike in RS, where you are given cards representing?commodities, the card itself is rotated to indicate how many?of each type you have. To?decrement a commodity, you rotate the card to the next lower amount. To add, you rotate to the next higher. You can never have?more than three?of any commodity on a card.
Settlements, Roads, and Cities -?these are similar to their counterparts in RS.
Expansions -?these are like the cards found in Cities and Knights of Catan. These include buildings, knights, and nasty cards like the Spy. You also find the equivalents of the RS harbors, “Fleets”.
Events -?these have a large question mark on the back, and various effects on the face. These range from Plagues and Civil Wars, to general Conflict.?Each is usually a “bad thing” that happens to one or both of you. Usually by stealing your resources or killing your knights or whatnot.

Each player begins with their principality. This is comprised of two settlements, separated by a road, and one of each of the region types. The regions are equally distributed from 1-6.

city

To the side are placed the cards do be drawn. The expansion cards are separated into five approximately equal stacks. The other types get their own stacks

pickingcards

To start, each player picks one of the expansion stacks and picks through it?for any three cards. It isn’t explicitely stated in the rules, but I order the cards so that the next good ones are on top. (Don’t tell anyone this super secret strategy! It’s our secret!)

The rest of the game is fairly simple. The current player rolls two chunky D6 dice.?One is the?”Production” die whit the usual numbers 1-6?, and the other, the “Event” die?has five different symbols:

Sun – Year of Plenty – Each player takes an extra resource of their choice
Knight – Tournament – Whichever player has the best “show knights” gets a resource of their choice
Question Mark – Event – An event card is drawn, and it’s effects are determined (this symbol appears twice)
Club – Brigand Attack – Any player who has more than seven unprotected resources loses all their ore and wool
Windmill – Commerce?- The player in control of the Commerce marker may take one resource from their opponent

First, the?event die is resolved. When this is done, the results of the production die are applied.?

Then, the player can build just like in RS. You rotate your cards to spend the resources, and add roads, and settlements.

Here I have expanded to the right with a new road and settlement.

city2

When you build a new settlement, you also acquire a pair of region cards, possibly increasing the number of commodities produced with each die roll.

Each settlement can have two expansions,?physically located at the top and bottom?of the settlement card. Here I’ve?used up all of my expansion options, without adding an entirely new settlement.

city3

Eventually, settlements can be converted to cities, which allow four expansions, as seen below.

city4

The goal is to?acquire 12 victory points, which you get?through the normal course of expansion. As an example, a settlement is worth?one victory point. A city is worth?two.?

So, was it fun?

I loved it. I like the action of turning the cards for production. I also like the fact that your starting principality has regions for each side of a d6. This means that you get something on every roll. (I am always picking the worst hexes in?RS!) I also like that fact that it can be played with two.?The addition of the event die?adds tension, and balances?the?steady?flow of commodities by constantly taking them in?various ways.?

The problem is, ?Mrs. G wasn’t thrilled. I tried to encourage trading, even though I really had nothing to trade. This got her pretty grouchy. I also kinda… sorta… TOTALLY KICKED HER ASS! (Which I wouldn’t normally gloat about, but it is just very unusual for me to win in any game I play with her.)

So, I took it to work and played it with Dangerkitty over lunch. Then I showed The Los how to play it. Then… I drove home with the box open on the passenger seat. I gazed at the cards lovingly, and even shuffled them?at the stop lights.?

Yeah… I’m healthy.

So, if you liked “Real Settlers”, and frequently find yourself with only one gaming partner, this is the game for you.

14 Sep

The X-Mods Debacle

So, right about the time that I became pregnant with child #2, I went totally friggin nuts. Before then, I had a DVD habit, and the obvious video game habit, but… never anything like this:

american

and this:

truckin

and this:

tunerfish

and… this:

somebody's baby

(The sad thing is… that ain’t all of them.)

Anyway… for some odd reason, my fear of being a daddy again translated into buying crap.?A lot of crap. A lot of weird crap.

For a while there,?all I could do was think about X-Mods cars, all I would talk about was X-Mods cars. I went online and?made strategies for acquiring every X-Mod model that ever existed (which I kind of did, actually.)

I?even had?my pals hit up Radio Shack for returns.?Basically, if you bought a car and broke it, it would get returned to the store, where it would sit on the shelf for 5 or 6 months before it got dumped in the trash. We would go in or call and ask if they had any broken X-Mods they would sell for cheap. The Paladin was the master. He managed to snag about 15?broken cars for me (after skimming off?his picks, of course.)?Often we found that the cars were perfectly fine, and if not, they just needed minor repairs. I was pretty happy getting broken ones, because fixing them felt good, and if not, it became more parts to fix others.

?So… in the ultimate act of nerditude, I ended up turning my garage into an X-Mods track. Here’s how it turned out:

IMG_0633

The light grey surface is the garage floor. It is very slick. The dark grey is a bunch of Marcy Puzzle Mats from Walmart. This stuff is perfect, and relatively cheap. The outer edge of the track is 1/2″ PVC piping wrapped in insulating pipe wrap. The ramp is a?plastic artists portfolio hacked up?taped on the the track. The chevrons are made from yellow electrical tape.?

IMG_0632

The cars would drop in from the top, slide around the middle median, then would get back up the ramp. If you missed the ramp, you would have to reverse and try again.?

Here’s a YouTube video of the early track:

[youtube=http://www.youtube.com/watch?v=GsZa1py-Ug8]

The goal was to have 12 cars racing during Bunker Parties, and it almost worked.

The thing about X-Mods, is that they have modifiable parts, and 12 different possible frequencies, which meant that you could race 12 at a time.

The problem is, the frequencies are very close together, and they still bleed.

So, when I had everyone gathered together, and we were standing there with our controllers, the cars would start, and make it halfway down the track, but as soon as they hit the far left corner, only one would continue to work. Since we were all standing in a line, all the controllers were jamming each other.

That was a lot of time and money down the drain.

Anyone want to buy some X-Mods cars?

11 Sep

Building the Bunker – The Platform

The Room, empty and doorless

Today alone,?I got about 1200 views from xbox.com.?In the forums,?I got a lot of “that?must cost a lot” types of posts.

However, one of the goals of the Bunker Project Log is to show that there are lots of cool things you can do with a little work, and hopefully less money.

Since I’ve just managed to dig?a few pictures?up, and have been promising them elsewhere, here are some shots of?Bunker 2.0 in it’s infancy.

Here is the underside of the platform that the second set of seats are bolted down to. It is 9″ high, which is just enough to see over the recliners in the front row, without blocking the view from the Lan (not that people are looking at it much.) The wood for this cost around $80, IIRC.

The bottom of the platform

I’m not going to say that the platform is square, nor perfectly engineered, but it is really heavy, and those chairs aren’t going anywhere.

The chairs themselves came from an eBay action, $40 each… shipped. I bought seven so I would have a spare just in case. I feel very lucky to have gotten in on that deal. I think my general lack of luck in games (I always lose) is made up for with finds like this.

Bolted down

The chairs came out of the box?smelling a little moldy smelling, but once they had aired out for a week or too (and a little Fabreze), they?are just fine. They are also surprisingly comfortable. At least, no one seems to mind sitting back there.

Finally, I wrapped the platforms in this synthetic outdoor carpet stuff you see here. I think this came out to about $25 with the adhesive. This was actually one of the most nerve-wracking parts of the install, because it barely fit, and I had to goop the entire thing up with the adhesive and lay it out just right.

?Of course, I took the chairs off the platform before I glued this stuff down.

The Platform naked, with it's eventual skin

All totaled, the second row of seats cost less than $400. That’s less than one of the Berkline Recliners that went in the front row.

Here is a picture where you can see them in the hubbub of a bunker party.

devilly??

And here is one of the few pictures I have where you can see these occupied (sort of)… by the H-man, all by his lonesome.

Dystopia blues??

09 Sep

Cobalt Flux 360… Success!

2 pads in the light

I’ve done it, two Cobalt Flux pads with 360 control boxes. It wasn’t cheap, but I’m a sucker for HD output (and Xbox Live Achievements, even though I totally suck at DDR).

In the end, all you really need is a soldering iron and solder, a screwdriver, a short length of Cat5 networking cable, a Male 9-pin D-sub connector (276-1537 at Radio Shack), and a MadCatz Beat Pad.

Here’s how it’s done:

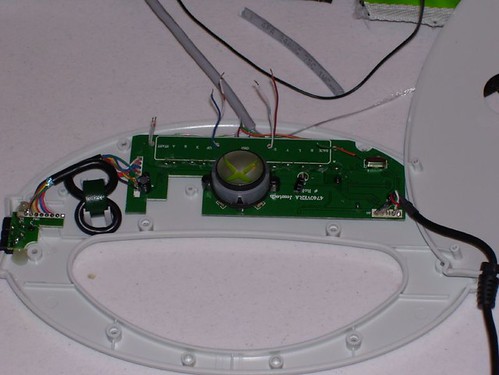
Take out all of the external screws on the white plastic shell, and open it up. Try to disturb as little as possible as you do this.

Opening

Remove the six screws that hold the central circuit board down. Lift up the board enough to reveal the ribbon connection to the pad.

Ready to rip

Now just separate the ribbon connector from the board. It is basically foam with some sort of adhesive on it.

On to the hard part… wiring up the dsub.

I have melted many a dsub connector before. The piece that holds the pins in place is plastic, so if you take to long to solder, you will melt it, and the pins will go all cock-eyed. So, what I did here is cut off little nibs of solder and dropped them into the pins.

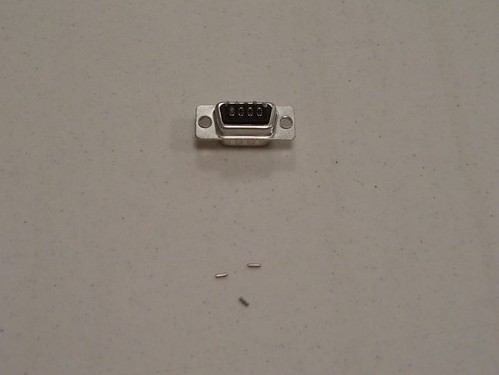
Here is the dsub filled with the nibs, except for the last three, which are below.

Dsub before prep

Now take the iron and touch it to each pin. The solder should flow in and fill the entire cavity.

Dsub prepped

Now you need to prep your wire. I used about a foot of Cat5. Unfortunately you need nine wires, and Cat5 only has 4-pairs. You can take a wire from another length of Cat5, or use another wire altogether. I just used some black hookup wire I had laying around.

Take the piece of Cat5 and strip an inch of the outer insulation off. Then about an 1/8th of an inch of insulation from each wire. (Don’t forget the ninth wire!)

Here’s the pinout for my particular Cobalt Flux. I, unfortunately have a pair of old-skoolers that only have eight buttons, so those of you with version 2, you’ll have to figure this out on your own!

New               OriginalColor     H   #   Color    Button

------------------------------------
Ground  - X - 1 - Purple - Ground

Blue    - C - 2 - Green  - Up

BlueS - B - 3 - Red - Down

Brown   - B - 4 - Orange - Left

BrownS - C - 5 - Yellow - Right

Green   - A - 6 - Blue   - B

GreenS - D - 7 - White - A

Orange  - A - 8 - Brown  - Back

OrangeS - D - 9 - Black - Start

I have arranged the colors in alphabetical order: Blue, Blue Stripe, Brown, Brown Stripe, Green, Green Stripe, Orange, Orange Stripe. Ground is pin 1. The?H column?indicates what hole you should run the wire through. The original color column is what color the wire was in my Cobalt Flux Control box.

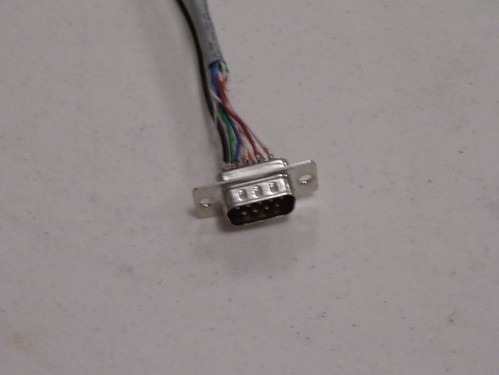
Here is?a very exciting (and blurry) pic of the completed?dsub connector?

Dsub soldered up

Now you need to do is connect all this stuff to the box.

Strip about?three inches from the outer insulation?on the other end?of the Cat5.?Strip?each?wire about 1/8″. Just like last time.

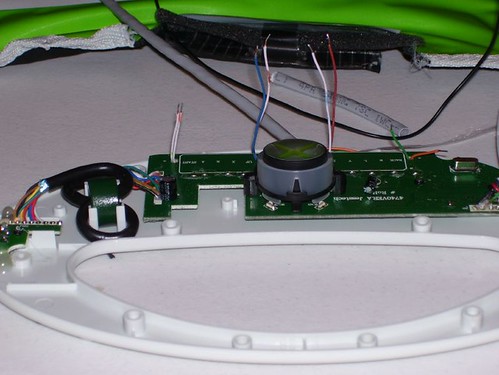
There are?four screw holes in the?central circuit board. I used these to thread the wires through creating an improptu strain relief. These are the holes mentioned in the H column above. Hole A is closest to the word “Back” silkscreened on the board. Hold D is closest to the word “Start”. Run each pair through each hole. The ground wire has no hole.

Ready for soldering

And another view… just a little blurrier!

Wires in and prepped

Now all you have to do is bend them over and solder them to the pads marked so nicely for you. My pad only has eight contacts, so I just ignored the “X” and “Y” solder pads.

Almost done

Once you’ve done that, Put all the outer screws back in. (Do not out the four that went in the holes you just used!) All done!

2 Pads!

Yay!?There will be much?public DDR?humiliation at the next Bunker Party!?

07 Sep

DDR 360! Unsuck the Flux

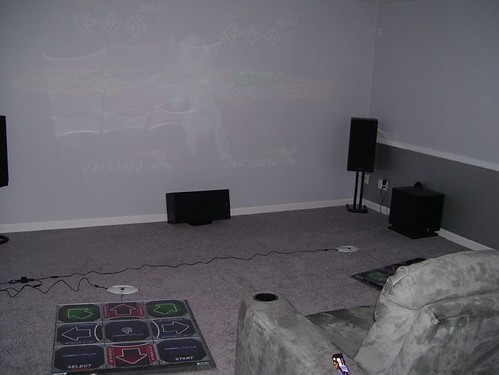
Look closely, there’s a pad in the darkness!

100_0445

I’ve already complained about how Cobalt Flux has hozed the DDR action two Bunker Parties in a row.

But, I’ve decided that I am not going to be a victim! I am going to take my life back!

Since the control box on one of my CF pads is shot, I am going to replace it by hacking together a 360 Control Box.

Unfortunately, this means sacrificing an existing 360 dance pad. In this case, it will be a MadCatz Beat Pad.

100_0446

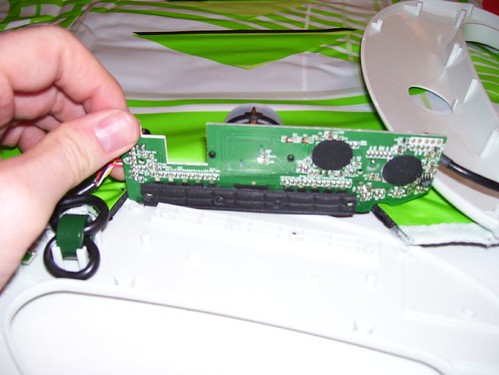
It opened up pretty well. Here is the front side, and the ribbon that leads into the rest of the pad. This is very well marked, the whole thing will go lickity split.

100_0449

And the other side, once separated from the ribbon. I tested it by running a wire from ground and tapping each one of the button pads. Success!

100_0450

Now all I have to do is go to the Rat Shack tomorrow and get a D-Sub connector… or I could hack apart my broken CF Contol Box.

Here’s the CF box. This cracks me up. It looks like they had a new board fabbed, but soldered it to a gutted Playstation control board. Work smarter not harder I suppose!

100_0455

Hopefully this wil conclude tomorrow, I need some sort of exercise for my diet regimen!

06 Sep

Bunker Lan Guts

While fixing the cable bundle, I was forced to rip open the kickwall that the Lan displays and inputs are wired through. Here’s what’s in there, for the interested… or extremely bored.

What is in the Lan kickwall

As you can see, there are eight bundles of wires. Each is?an HD15 video cable coupled with?an active USB extension cable. This is the purple plastic thing you see connected to the beige USB A-B cable in the center. The beige cable goes to a 4-port hub. Each hub?allows ports for a standard Microsoft Wheel Mouse Optical, a Saitek Eclipse Keyboard, a Logitech 350 USB Headset, and a Logitech Wingman Force 3D stick.???

You can find the?USB?Active extensions?here at Monoprice, which I very highly recommend to anyone buying large amounts of cables. I have ordered from them many times, and never had a problem.?

The Saitek Eclipse was supposed to?allow you to see the keys in the dark, but I don’t know if it really helps.??????

The eight bundles?branch off at each?terminal area, leaving three at the end. These three bundles crawl up the wall a foot or three and continue on into wire moulding.

Here is where the three at the end?come out. The chair rail on the left was manufactured by my buddy Jjam and I. The stuff on the right is Cablemate chair rail?:

lan-backwalltowallwiremoulding02

The cleverly concealed wires 😉 seen from behind:

lan-backofthreeshowingwirebundle

More detail of a single display from above:

lan-backthreebundlecloseup02

Here is what the three machines on the back look like from afar:

lan-lightson

I am thinking of?moving the three machines on the back wall to?the wall directly to the right (where the table is). This will?make?it a little easier to split the group into teams, and aslso make it harder for players to see?each others screens.

?Of course I will have to come up with?two more Lan machines. Let me know if you have any donations. :D?

05 Sep

The Cable Bundle Solved! (for now)

The finished product:

A little masculine, but safe

I’ve been bitching about the cable bundle for a while now, and finally decided to post it up at avsforum.com?to see what the AV masters could come up with. One of the users over there, rgroves, suggested that I look at Checkers. So I did, and immediately requested a quote, mentioning the situation.

I got a call back within the hour, and I found myself ordering “The Fastlane“.

It was roughly an hour later that rgroves responded to my thread suggesting that I just build something rather that buy something that would “probably look hideous in your room”.

That made me feel a little toolish, but whatev, I’m a busy guy, so I can cut corners somewhere right?

However, this is supposed to be a project log, and there was a tiny bit of elbow grease expended to make it all work, so here are some pictures…

This may void my warranty!

This may void my warranty

When I cut it, it vomited out these black wormy shavings, it was kinda creepy. The pic doesn’t do it justice.

Rubber Spray

For those of you concerned with the obvious aesthetic problems, here is what the average bunker attendee will see

What the average Bunker Party attendee will see

So, it’s all good, sort of.

??

05 Sep

Singstar Celebration in the works! Bunker Party soon!

What I need to do:

Rebus 001!

Singstar 80’s and Amped are out in less than two weeks. This demands a Bunker Party! Unless aliens attack (or Mrs. G pitches a fit) the next Bunker Party is go on Sept. 21, 2007!

Because of this, I am making a few goals:

  1. I will have both of my Cobalt Fluxes working!
  2. I will have at least one Cobalt Flux hacked to work on DDR Universe 360!
  3. I will make significant progress on either the Mame Cocktail, or standup cabinet!

Can he fix it? Yes he can!

Wish me luck!

© 2026 Bunker Project Log | Entries (RSS) and Comments (RSS)

Global Positioning System Gazettewordpress logo